Here comes the Xhorse Dolphin XP005L (Dolphin II) key cutting machine maintenance manual.
This manual is applicable to models with serial number KM10, KM11 of Dolphin II.
Contents:
- Machine disassembly exploded pictures
- Replace the battery
- Replace the mainboard
- Replace the screen
- Replace the spindle motor belt
- Replace the motor
- Replace the X-axis screw shaft motor
- Replace the Y-axis screw shaft motor
- Replace the Z-axis screw shaft motor
- Replace the X-axis sensor
- Replace the Y-axis sensor
- Replace the Z-axis sensor
- Replace or inspect the probe wires
- Replace or inspect the cutter wires
- Replace the probe shaft or the cutter shaft
- Main shaft abnormal noise maintenance
- Replace the key switch and USB port
- Replace clamp parts M2 clamp
- Replace clamp parts M5 clamp
1 Machine disassembly exploded pictures
2 Method of replacing parts due to machine malfunction
2.1 Replace the battery
Please refer to the disassembly pictures P1, P2, P3, and P4 in Chapter 1. Remove the screws in the red frame separately to replace the battery module with a new one, and plug in the three wiring ports of the battery accordingly
2.2 Replace the mainboard
Reason for replacement:
1. The cutter non-conductive
2.Unable to charge
3.Unable to power on or upgrade.
4. LED light does not light up
5.Startup error
6.cutting error.
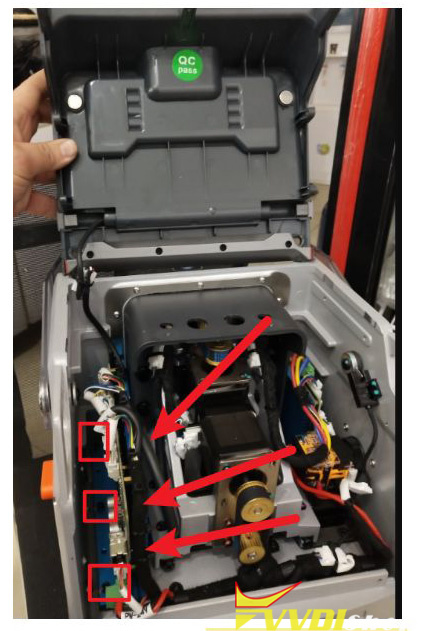
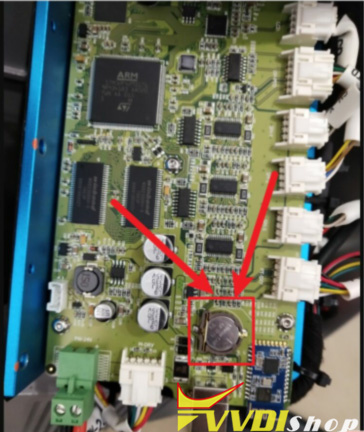
Please refer to the disassembly pictures P1 and P2 in Chapter 1. Remove the screws in the black frame to remove the rear cover. Then refer P5 to remove the screws at position Z of the white frame at ⑩, and then remove the screws in the black frame at ① to ⑤ separately to replace the mainboard with a new one. Insert the mainboard port according to the wire harness label.
2.3 Replace the screen
Please refer to the disassembly pictures P1 and P2 in Chapter 1. Remove the screws in the black frame separately to remove the rear cover and screen, then remove the screws in the white frame, as shown in the following picture, remove the wires in the circle, then push out the bracket that fixes the screen, and finally remove the plastic pins from the screen harness, then you can separate the screen from the back rover.
2.4 Replace the spindle motor belt of xhorse dolphin ii
Due to long-terms use, the belt should be replaced in a timely manner when it ages, breaks or slips (breaking the cutter during cutting). Refer to P1 and P2 in Chapter 1, remove the screws in the black frame to remove the rear cover, then refer P5 to remove the screws in the yellow frame at ⑥⑦, and then rotate the Z-axis in the red circle clockwise to its highest position, then refer P6 to remove the screw from the red frame at ①② to remove the front cover and screen and replace them. Then refer P7 to replace the belt. Insert the mainboard port according to the wire harness label.
2.5 Replace the motor
2.5.1 Replace the spindle motor
When the motor makes abnormal noise, it needs to be replaced. Refer chapter 2.4 to remove the front cover and belt, then refer P7 to remove the screws in the white frame at ①② and green frame at ③, after that, replace it directly.
2.5.2 Replace the X-axis screw shaft motor
When the screw motor gets stuck or bent, the X-axis screw shaft motor need to replace. Refer to the disassembly pictures P1 and P2, remove the screws in their black frame separately to remove the rear cover, refer P8 to remove the screws in the red frame at ③④, after that, replace it directly. Replace the x-axis rail need to refer to chapter 2.1. Remove the battery first, then refer P9 to remove the screws in the black frame at ①, then remove screws in the red frame at ② and the white screws at③④, after that, replace it directly
2.5.3 Replace the Y-axis screw shaft motor
When the screw motor gets stuck or bent, the Y-axis screw shaft motor need to replace. Refer chapter 2.2 to remove the mainboard first, then refer P8 to remove the screws in the black frame at ①② and the red frame at ③④, refer chapter 2.5.2 to remove the X-axis screw shaft motor first, then refer P10 to remove the screws in the black frame at ①, remove the screws in the red circle in the picture below , then replace the Y-axis screw shaft motor directly.
2.5.4 Replace the Z-axis screw shaft motor
When the screw motor gets stuck or bent, the Z-axis screw shaft motor need to replace. Refer to the chapter 2.2 to remove the mainboard first, refer P8 to remove the screws in the black frame at ①②, then refer P10 to remove the screw in the white frame at②③, then replace the Z-axis screw shaft motor directly.
2.6 Replace the sensor
2.6.1 Replace the X-axis sensor
When the sensor is defective or damaged, it needs to be replaced. Please refer P1 and P2 to remove the screws in the green frame and remove the rear cover, then refer P5 to remove the screws at position X in the white frame at ⑧, then replace it. Insert the mainboard port according to the wire harness label.
2.6.2 Replace the Y-axis sensor
When the sensor is defective or damaged, it needs to be replaced. Please refer P1 and P2 to remove the screws in the green frame and remove the rear cover, then refer P5 to remove the screws at position Y in the white frame at ⑨, then replace it. Insert the mainboard port according to the wire harness label.
2.6.3 Replace the Z-axis sensor
When the sensor is defective or damaged, it needs to be replaced. Please refer P1 and P2 to remove the screws in the green frame and remove the rear cover, then refer P5 to remove the screws at position Z in the white frame at ⑩, then replace it. Insert the mainboard port according to the wire harness label.
2.7 Replace or inspect the probe wires
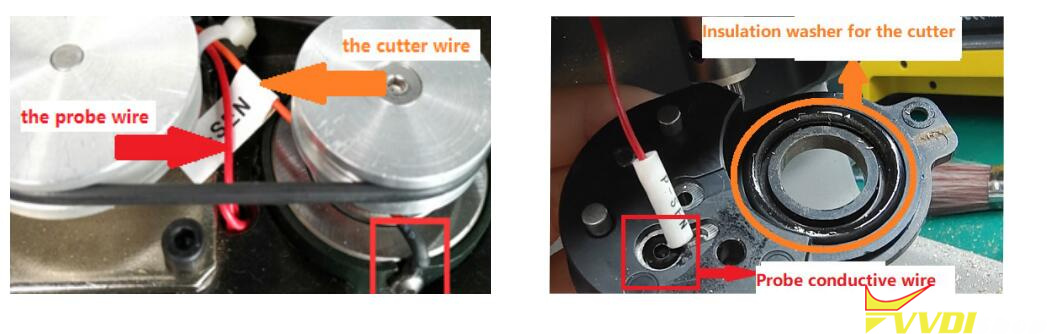
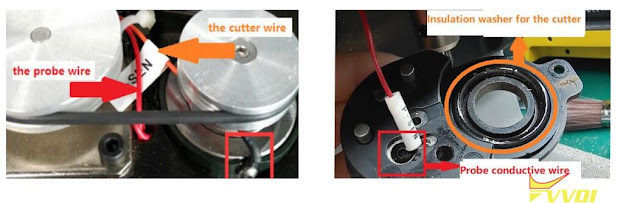
2.7.1 The probe non-conductive Poor contact or broken circuit caused by worn probe wires. Refer chapter 2.3 to remove the front cover and belt, then refer P7 to remove the green frame at③, refer P6 to remove the white frame at③④⑤. As shown in the left picture below, gently pull the red probe wire forward while shaking the probe base. Then in the right picture below, you can see the screw which fixed probe in the red frame, unscrew it to replace the probe and cutting wires. Insert the mainboard port according to the wire harness label.
2.7.2 The probe remains conductive
Refer to chapter 2.7.1, check if the probe wire is broken, and if there are metal debris near the fixing screws or at the lamp panel (don’t blow with an air gun)
2.8 Replace or inspect the cutter wires
2.8.1 The cutter non-conductive
Poor contact or broken circuit caused by worn probe wires, refer chapter 2.7.1 to replace the probe and cutting wires. Insert the mainboard port according to the wire harness label.
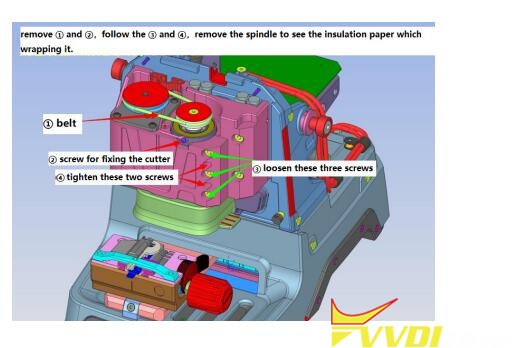
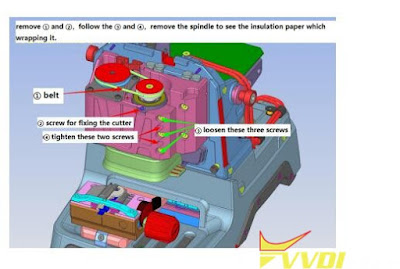
2.8.2 The cutter remains conductive Refer to chapter 2.7.1, check if the cutter wire is broken, and if there are metal debris near the fixing screws or at the lamp panel (don’t blow with an air gun). If none of the above situation exist, the cutter remains conductive, refer P7 to loosen the screws in the black frame at⑤⑥⑦, and tighten the screws in the red frame at⑧⑨, use your fingers to push the cutter hole upwards slowly, then observe if the white insulation paper is broken or if there are metal debris inside the cutting shaft (Don’t blow with an air gun), refer to the picture on the right. when reinstalling the screws, it is necessary to refer P7 to loosen the screws in the red frame at⑧⑨ first.
2.9 Replace the probe shaft or the cutter shaft
When the top thread of the probe and the cutter is slippery and cannot be removed, it is necessary to replace the probe shaft or the cutter shaft. Replace the probe shaft needs to refer chapter 2.7.1 and replace the probe base. Replace the cutter shaft needs to refer chapter 2.8 and remove the cutter shaft, then refer chapter 2.10 to disassemble it.
2.10 Main shaft abnormal noise maintenance
Reason for abnormal noise: metal debris present, belt wear and large gap in the shaft hole for the cutter. Refer chapter 2.3 to remove the front cover, clean the metal debris, replace the belt, or refer P7 to loosen the screws in the red frame at⑧⑨, and tighten the screws in the black frame at⑤⑥⑦. The disassembly and assembly of the spindle structure are as follows:
2.11 Replace the key switch and USB port
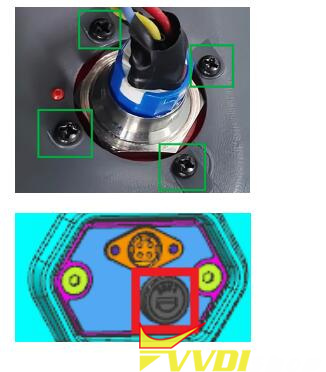
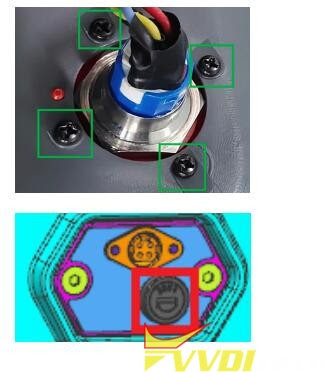
Replace the key switch needs to refer the P1 and P2 and remove the screws in the black frame, and remove the rear cover, then refer to the picture on the right, remove the screws securing the switch on the rear cover in the green frame, then replace it. Replace the fuse need to refer to the picture on the right, on the back of the machine, remove the screws in the red frame, and rotate it out to replace it.
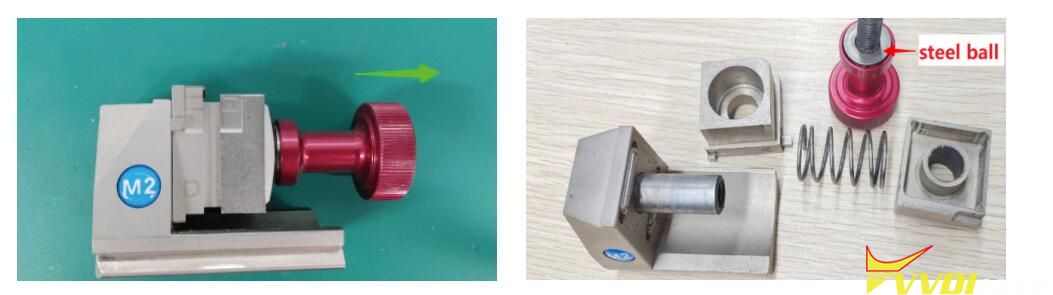
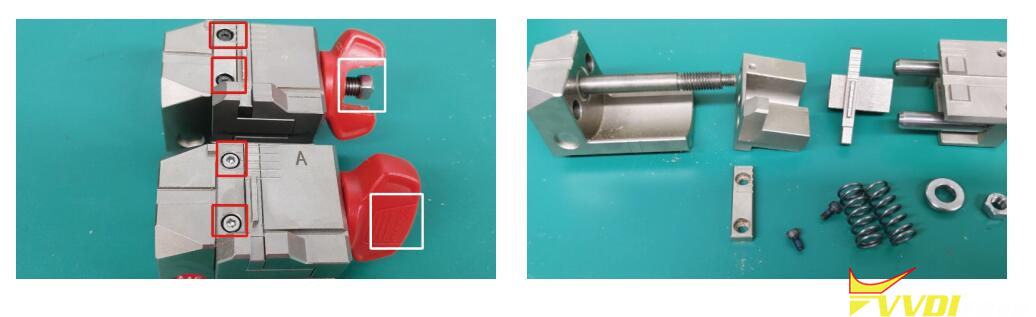
2.12 Replace clamp parts M2 clamp: Rotate the knob outward on the left picture, then it can be disassembled. Replace the corresponding parts according to the picture on the right.
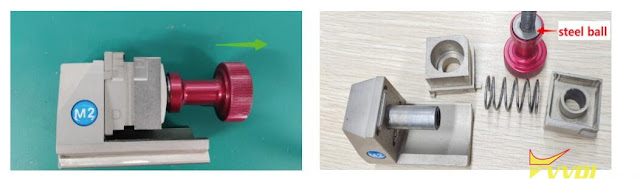
Note: M2 clamp needs to pay attention to the gaps in the fright figure , align it before tightening, Otherwise, it may get stuck.
M5 clamp: Remove the nut in the white frame and remove the screws in the red frame on the picture below, rotate the knob outward on the left picture, then it can be disassembled. Replace the corresponding parts according to the picture on the right.
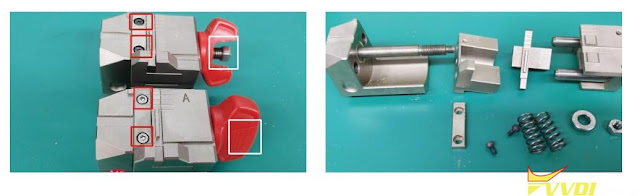
Download Dolphin II maintenance manual in PDF format.
https://www.vvdishop.com/upload/pro/23100616966509961519.pdf
https://www.vvdishop.com/service/xhorse-dolphin-ii-maintenance-manual.html

.jpg)
.jpg)
.jpg)
.jpg)
.jpg)
.jpg)
.jpg)
.jpg)
.jpg)


.jpg)